 Listicle
Common Mistakes When Laying Laminate Flooring
Table of Contents
- Why 99% of Laminate Flooring Failures Trace Back to Installation
- Subfloor Mistakes That Wreck a Laminate Floor
- How to Acclimate Laminate Flooring (And Why Skipping It Causes Buckling)
- Laminate Flooring Expansion Gap Requirements: Getting the Perimeter Right
- Choosing the Wrong Underlayment and Moisture Barrier
- Locking System Damage and Click-Lock Failures
- Laminate Flooring Installation Tools That Prevent Costly Errors
- Post-Installation Maintenance Mistakes That Shorten Floor Life
- Frequently Asked Questions
Last Updated: September 11, 2026
Why 99% of Laminate Flooring Failures Trace Back to Installation
Approximately 99% of laminate flooring failure claims are attributed to installation errors, according to PacMat's analysis of common causes. This statistic should alarm any homeowner considering DIY installation or hiring an inexperienced contractor. The problem isn't the flooring itself, it's how it's laid. We've seen countless projects derailed by preventable mistakes during the laying laminate flooring process. What makes this frustrating is that most errors are completely avoidable with proper preparation, the right tools, and attention to manufacturer guidelines. The stakes are real: a failed installation can mean warped planks, buckling floors, costly repairs, and the expense of starting over.
Whether you're planning a DIY project or evaluating a contractor's proposal, here's how to avoid the most common pitfalls when laying laminate flooring.
Subfloor Mistakes That Wreck a Laminate Floor
Your subfloor is the foundation of everything. Get this wrong, and no amount of quality laminate will save your project, and because prep is invisible once the planks are down, it's the step most installers rush.
Skipping Moisture Testing on Concrete Slabs
Concrete holds moisture. A lot of it. If you install laminate directly over a damp concrete slab, water will wick up through the planks, causing them to swell, warp, and eventually fail. Using a General Tools Digital Moisture Meter ($40) takes 10 minutes and prevents thousands of dollars in damage.
Concrete should measure below 3% moisture content before installation. Higher readings mean you need a true vapor barrier, not just any underlayment. Skipping this step is the single most common reason for premature failure in basements and ground-floor installations.
Installing Over Uneven or Dirty Surfaces
Laminate is rigid and won't conform to an uneven subfloor. Install over bumps, dips, or debris and the planks rock, stressing the locking system until the locks fail, gaps appear, and your floor sounds like it's walking with you.
An Empire Level 48-inch Aluminum Level ($35) is your first tool. Check the entire floor systematically. Anything higher than 3/16 inch over a 10-foot span needs leveling compound. Anything lower than 1/8 inch over 10 feet needs filling. Clean the subfloor completely, dust, debris, and old adhesive all interfere with underlayment contact and create voids where moisture can hide.
| Subfloor Issue | Detection Method | Required Fix |
|---|---|---|
| High moisture | Moisture meter reading >3% | Install vapor barrier |
| Uneven surface | 48" level showing gaps | Apply leveling compound |
| Debris/dust | Visual inspection | Vacuum and sweep thoroughly |
| Low spots | Level shows dips >1/8" | Fill with self-leveling compound |
How to Acclimate Laminate Flooring (And Why Skipping It Causes Buckling)
Laminate planks expand and contract with temperature and humidity. Skip acclimation and they'll do it after installation, causing peaking (planks buckling upward at the seams) and gapping (seams opening up).
Acclimation means leaving unopened boxes in the installation room for 48-72 hours before laying laminate flooring begins, so planks adjust to the room's conditions. This is not optional, manufacturer warranties explicitly require it, and skipping it voids your coverage.
During acclimation, monitor relative humidity. Ideal conditions are 40-60% humidity and 65-75°F. Below 40% (common in winter with heating), use a humidifier; above 60% (basements, coastal areas), use a dehumidifier. Stabilize conditions before opening a single box.
Laminate Flooring Expansion Gap Requirements: Getting the Perimeter Right
Laminate needs to move. Every wall, door frame, and fixed object gets a gap. This isn't about aesthetics, it's about physics. When humidity rises, planks swell. Without expansion room, they have nowhere to go except up, causing buckling.
The standard expansion gap is 1/4 inch around all perimeter walls; for rooms over 40 feet in any direction, some manufacturers recommend 3/8 inch. Check your flooring's specific requirements on the box or in the installation guide.
The Roberts Laminate and Wood Flooring Installation Kit includes 30 expansion gap spacers ($25) that hold consistent gaps while you work, preventing uneven spacing that creates visible gaps in some areas and buckling in others. Use spacers at every wall, around door frames, and along fixed cabinetry.
After installation, cover the gaps with baseboards or trim, but don't caulk them, since caulk prevents the floor from expanding. Use trim that can slide slightly as the floor moves.
Choosing the Wrong Underlayment and Moisture Barrier
Underlayment is two jobs stacked together: cushioning the floor and blocking moisture. Confusing them is the root of most underlayment mistakes, because a product that does one well often does the other poorly.
Start by separating the two functions.
Cushion underlayment is foam, cork, or felt. It softens footfall, absorbs minor subfloor imperfections, and quiets the hollow click of laminate. Standard closed-cell foam runs 2-3 mm thick and costs roughly $0.15-$0.30 per square foot. Thicker is not better: foam over about 3 mm lets planks flex at the seams, fatiguing the locking system and producing the gapping you were trying to prevent.
Vapor barrier is a separate sheet of polyethylene (typically 6 mil) or a foil-faced membrane. Its only job is to stop moisture vapor from migrating upward through a concrete slab. It does not cushion, and it does not replace cushion underlayment unless it is a combo product.
That distinction drives the decision tree:
| Subfloor | What you need | What fails |
|---|---|---|
| Concrete slab, on or below grade | Vapor barrier plus cushion (or a combo membrane) | Foam-only underlayment; moisture wicks up and swells planks |
| Concrete slab, above grade, verified dry | Cushion with attached vapor barrier | Bare foam over a slab that later reads high moisture |
| Wood subfloor, normal conditions | Cushion only | Adding a vapor barrier traps moisture in the wood and causes cupping |
| Wood subfloor over a crawlspace | Cushion plus a separate vapor barrier on the ground below | Sealing the floor from above while the crawlspace stays damp |
The most common error is putting a vapor barrier over a wood subfloor. Wood needs to breathe; trap moisture between planks and subfloor and you warp the wood and delaminate the laminate from below. Vapor barriers belong over concrete, not plywood or OSB.
The second most common error is installing a combo membrane upside down. Foil-faced products have a specific orientation, foil side faces the room, foam side faces the slab. Flip it and you lose the reflective benefit and can trap condensation against the concrete.
Installation details matter as much as product choice:
- Run underlayment perpendicular to the plank direction, not parallel. This keeps seams from lining up with plank seams and creating a continuous weak line.
- Overlap seams by 6 inches and tape them with the manufacturer's recommended tape. Untaped seams let fine dust migrate underneath, and dust under a floating floor becomes a grinding abrasive every time you walk.
- Do not double-layer cushion underlayment. Two layers of 2 mm foam is not the same as one layer of 3 mm; it is a soft, unstable bed that lets planks rock.
- Do not use underlayment as a leveling agent. If the subfloor is out of flatness, fix the subfloor. No underlayment will compensate for a 1/4-inch dip.
Finally, check the warranty language before you buy. Many laminate manufacturers specify a maximum total underlayment thickness and a required vapor barrier perm rating for concrete. Exceed the thickness or skip the barrier and the warranty is void regardless of how well the floor performs. The box and the installation guide state these limits; read them before the first plank goes down.
Locking System Damage and Click-Lock Failures
Modern laminate uses click-lock systems: the tongue on one plank locks into the groove of the next. Strong when done correctly, fragile when it's not.
The most common locking failure comes from forcing planks together. A plank that doesn't seat properly needs to be removed and reinserted, not hammered harder. Excessive force cracks the locking mechanism. Once the lock is damaged, that plank is scrap.
Use a tapping block and pull bar correctly. The tapping block distributes force across the plank's edge, preventing point-load damage, and the pull bar (included in the Roberts Installation Kit) seats the final rows without pounding. If a plank won't seat after three gentle taps, stop, check the groove for debris or misalignment, remove the plank, clean it, and try again.
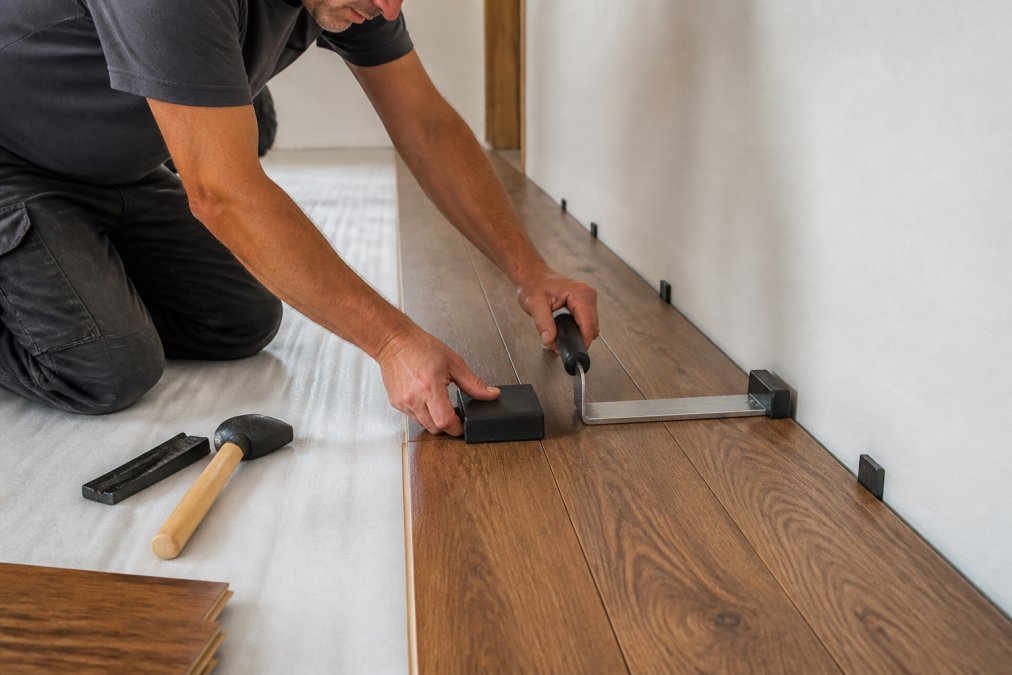
Another failure point is the staggered joint pattern. Never align the end joints of adjacent rows. Stagger them by at least 12 inches. Aligned joints create a weak line where the floor can break or separate under stress.
Laminate Flooring Installation Tools That Prevent Costly Errors
Most guides tell you which tools to buy; fewer tell you which tools cause damage. That second list is where DIY installations actually fail, because the wrong tool destroys planks, voids warranties, and creates defects you can't see until the floor is finished.
Here are the tool-specific errors that ruin laminate installations, and what to use instead.
The wrong saw blade
Laminate is a composite, a photographic layer over a high-density fiberboard core, and it chips easily. A low-tooth crosscut blade tears the surface layer, leaving a ragged edge that won't seat cleanly in the groove. Use a carbide-tipped blade rated for laminate or melamine, typically 60 to 80 teeth. With a circular saw, cut decorative face down; with a jigsaw, face up. Backward orientation is a leading cause of chipped edges on visible planks.
A manual laminate cutter avoids the problem entirely, scoring and snapping the plank for a clean edge with no dust or blade burn, faster and cleaner than a saw for a small room. For complex cuts around door frames and vents, use a jigsaw with a fine-tooth laminate blade.
The wrong spacer
Expansion gap spacers are not optional and not interchangeable with scrap wood. A 2x4 wedged against the wall gives an inconsistent gap, sometimes 1/8 inch, sometimes 3/8 inch, so the floor buckles in some places and opens in others. Use uniform 1/4-inch spacers at every wall and check them as you work; spacers that fall out mid-row are why so many DIY floors peak at one wall and gap at the opposite one.
The wrong tapping block
A scrap of wood or a hammer directly on the plank edge crushes the tongue and cracks the locking mechanism. A proper tapping block, hard plastic or dense rubber with a groove that seats over the plank edge, distributes force across the full width. Use it with a rubber mallet, not a metal hammer.
The wrong pull bar
For the final row against a wall, you can't swing a mallet. A pull bar hooks over the plank edge and draws it into the previous row with controlled force; a pry bar or screwdriver concentrates force on a single point and cracks the groove.
The wrong level
A 12-inch torpedo level tells you almost nothing about subfloor flatness. Laminate failures come from dips and humps measured over a 10-foot span, not a 1-foot span. Use a 48-inch or longer straightedge or level and check the floor systematically in a grid. Anything over 3/16 inch deviation over 10 feet needs correction before a single plank goes down.
The wrong moisture meter
A pin-type meter for wood is the wrong tool for a concrete slab. Concrete moisture is measured with an in-situ relative humidity test, a calcium chloride test, or a meter specifically calibrated for concrete. A wood meter on concrete gives a meaningless reading, worse than no reading, because it gives false confidence.
| Tool error | Damage caused | Correct tool |
|---|---|---|
| Low-tooth crosscut blade | Chipped, ragged plank edges | 60-80 tooth carbide laminate blade, or manual cutter |
| Scrap wood spacers | Uneven expansion gaps, buckling | Uniform 1/4-inch expansion spacers |
| Hammer on plank edge | Crushed tongue, cracked lock | Tapping block with rubber mallet |
| Pry bar for final row | Point-load groove damage | Pull bar |
| 12-inch torpedo level | Missed subfloor dips and humps | 48-inch straightedge or level |
| Wood moisture meter on concrete | False moisture readings | Concrete-calibrated meter or in-situ RH test |
Post-Installation Maintenance Mistakes That Shorten Floor Life
How you care for your floor in the first weeks and months determines its long-term durability.
Never wet-mop laminate. Use a barely damp microfiber mop and dry immediately, standing water causes swelling and discoloration within hours. That's not a manufacturer defect, it's abuse.
Avoid placing heavy furniture directly on the floor. Furniture feet create point loads that crack planks or stress the locking system, so use felt pads under all legs and move heavy items carefully, dragging causes scratches and can shift planks.
Control humidity year-round. Winter heating dries out your home and opens gaps, so use a humidifier to maintain 40-60% humidity; in summer or coastal areas, dehumidifiers prevent swelling. Laminate is sensitive to humidity swings, stability is key.
Clean spills immediately. Laminate's surface is waterproof, but seams are not. Liquid that seeps into seams causes swelling. Wipe up spills within minutes, not hours.
Installation quality determines whether your laminate floor lasts 15 years or fails in two, and every mistake outlined here is preventable. Whether you're tackling this yourself or hiring a contractor, knowing these pitfalls puts you in position to get it right. We have helped countless homeowners navigate flooring installation with expert guidance and quality materials, and our team understands the specific challenges of coastal properties and high-traffic environments. Get started with a consultation to ensure your next floor installation is done correctly the first time.
Frequently Asked Questions
How much expansion gap is needed for laminate flooring?
Most manufacturers require a 1/4-inch to 3/8-inch gap between the laminate planks and any vertical surface, including walls, door frames, and cabinets. This gap allows the floor to expand and contract with changes in temperature and humidity. Without it, planks push against each other and cause buckling or peaking. Use spacer wedges during installation to keep the gap consistent, then cover it with baseboards or quarter round. Always check your specific product's installation guide, because requirements vary by manufacturer.
Why is my laminate flooring buckling after installation?
Buckling usually points to a few installation errors: no expansion gap at the perimeter, planks installed before they acclimated to the room, or a moisture problem in the subfloor. Industry data shows roughly 99% of laminate failure claims trace back to installation and environmental factors. If the floor was installed tight against walls or over a damp concrete slab, the planks have nowhere to expand. Pulling up baseboards to check the gap is the first diagnostic step. A moisture meter reading can confirm whether the subfloor is the culprit.
What tools do I need to install laminate flooring without mistakes?
At minimum, you need a tapping block, pull bar, spacer wedges, a tape measure, a level, and a moisture meter. A tapping block protects plank edges when you seat the locking system, and a pull bar lets you close joints near walls where you cannot swing a mallet. A 48-inch level checks subfloor flatness before you start, and a moisture meter confirms the slab or wood subfloor is dry. Kits like the Roberts Laminate and Wood Flooring Installation Kit bundle the tapping block, pull bar, and spacers together for around $25.
Do you have to cut the tongue off the first row of laminate?
Yes, you typically cut or remove the tongue on the first row so the planks sit flush against the starting wall. The tongue faces the wall and would otherwise prevent the plank from sitting flat or create an uneven gap. Cutting it off with a utility knife or saw lets the first row lie flat while still leaving the required expansion gap. Some manufacturers design planks with a removable tongue specifically for this purpose, so check the installation instructions before you cut.