 Ultimate guide
Install Luxury Vinyl Plank on Uneven Subfloors: Step-by-Step
Table of Contents
- Understanding Subfloor Flatness Requirements for LVP
- Step 1: Assess Your Subfloor Condition
- Tools Needed for Subfloor Preparation
- How to Fix Low Spots in Concrete Subfloors
- Step 2: Repair High Spots and Prepare the Surface
- Step 3: Moisture Barrier and Acclimation Requirements
- Luxury Vinyl Plank Installation Mistakes to Avoid
- When to Hire a Professional for Subfloor Repair
Install Luxury Vinyl Plank on Uneven Subfloors: Step-by-Step
Last Updated: June 30, 2026
Understanding Subfloor Flatness Requirements for LVP
Installing luxury vinyl plank on uneven subfloors is a common challenge. The click-lock mechanism that makes LVP easy to install also makes it unforgiving of uneven surfaces. When subfloors have high or low spots, planks can't seat properly into their locking grooves, creating gaps, movement, and accelerated wear. Within months, you'll hear clicking and creaking with every footstep.
Manufacturer Flatness Tolerance Standards
Most LVP manufacturers specify a maximum variance of 3/16 inch over 10 linear feet. This means if you measure across a 10-foot span with a straightedge, the gap between the straightedge and the surface should never exceed 3/16 inch. When planks bridge low spots, they flex and stress the locking mechanism. High spots cause planks to rock, leaving gaps where they don't contact the subfloor. Check your manufacturer's specifications in the installation guide before starting any prep work.
Why Flatness Matters for Click-Lock Systems
The click-lock system depends on consistent pressure distribution along each plank edge. When a plank bridges a dip, one end bears all the weight while the other lifts slightly, reducing grip. This imbalance causes premature lock failure and "creep," where planks shift position over time. Since LVP floats on the subfloor without fastening, the subfloor is entirely responsible for stability.
Step 1: Assess Your Subfloor Condition
Before buying planks, determine exactly what you're working with. This assessment dictates which repair strategy makes sense for your situation.
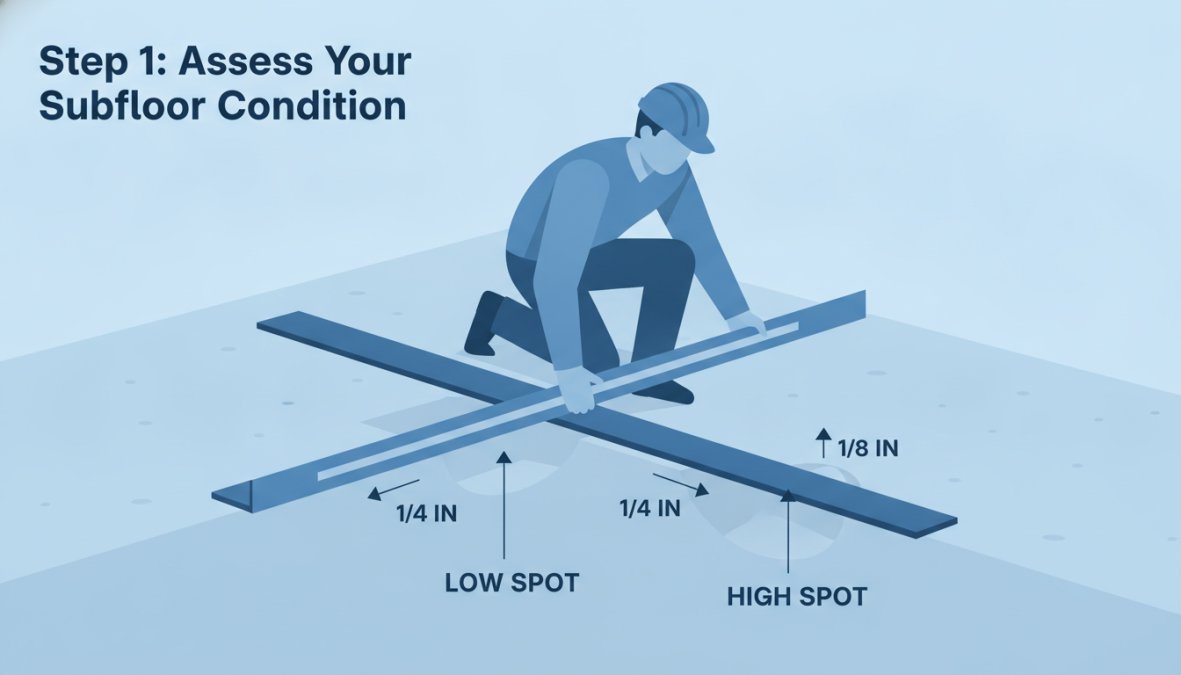
Identifying High Spots and Low Spots
Use a 6-foot or 8-foot straightedge as your diagnostic tool. Place it across different areas lengthwise, widthwise, and diagonally. Gaps indicate low spots; rocking on a peak indicates a high spot. Mark these areas with chalk and take photos for reference.
On concrete subfloors, run the straightedge in a grid pattern every 3-4 feet in both directions. Concrete slabs often have subtle undulations invisible to the eye. On wood subfloors, check for sagging between joists and deflection when walking across the floor.
Using a Straightedge to Measure Dips and Undulations
Measure the depth of each dip using a feeler gauge or shims under the straightedge. Record measurements on a sketch of the room, noting location, size, and depth of each problem area. Dips under 1/8 inch are minor. Between 1/8 and 3/16 inch, self-leveling compound makes sense. Anything deeper requires patching compound, plywood underlayment, or professional help.
Tools Needed for Subfloor Preparation
You don't need a professional contractor's full collection, but a few key items make the difference between success and frustration.
Measurement and Diagnostic Tools
Start with a 6-foot or 8-foot aluminum straightedge. A laser level is worth renting for large rooms ($25-40 per day). A moisture meter is essential, LVP is moisture-resistant, but moisture under the floor causes mold and subfloor degradation. Most manufacturers require moisture content below 12% for wood and below 3-4% for concrete. Add a tape measure, chalk line, pencil, and feeler gauge set to complete your diagnostic kit.
Repair and Leveling Equipment
For concrete subfloors, rent a concrete grinder to address high spots ($40-60/day). For low spots, you need self-leveling compound or patching compound, a trowel, mixing bucket, and drill with paddle mixer. For wood subfloors, a circular saw cuts plywood underlayment, and a power drill drives screws. A shop vacuum is critical, concrete dust is fine and pervasive.
| Tool | Primary Use | Cost to Rent |
|---|---|---|
| 6-8 ft straightedge | Measuring flatness | $15-25 |
| Concrete grinder | Removing high spots | $40-60/day |
| Laser level | Large-area assessment | $25-40/day |
| Moisture meter | Checking subfloor dryness | $30-50 |
How to Fix Low Spots in Concrete Subfloors
Low spots are more common than high spots on concrete slabs. The good news: they're easier to fix.
Using Self-Leveling Compounds and Leveling Agents
Self-leveling compound is the gold standard for filling low spots. Mix it according to manufacturer instructions using a drill with paddle mixer. Pour it into the low spot and let gravity do the work. Most products set in 24-48 hours and harden as solid as the concrete itself. Self-leveling compound works best for dips deeper than 1/8 inch and shallower than 1/2 inch.
Important: self-leveling compound is not waterproof. Address moisture issues first, then apply the compound.
Patching Compound for Minor Depressions
For dips shallower than 1/8 inch, patching compound works fine and costs less. Mix to a peanut butter consistency, apply with a trowel, pressing firmly into the depression. Feather edges to blend seamlessly. Patching compound typically cures in 6-24 hours.
Cost-Benefit Analysis: Repair vs. Underlayment vs. Professional Help
Self-leveling compound costs $20-40 per bag and covers roughly 50-100 square feet at 1/4-inch depth. For scattered low spots totaling 100-200 square feet, expect $50-150 in materials.
Plywood underlayment costs $40-80 per sheet (32 square feet). For a 200-square-foot room, expect $150-250 in materials. Underlayment also improves sound dampening and cushioning.
Professional subfloor repair costs $2-5 per square foot. For a 200-square-foot room with significant issues, expect $400-1000. Professionals have industrial equipment and experience with difficult scenarios.
The break-even point is roughly 150-200 square feet of problem area. Below that, DIY repair makes sense. Above that, underlayment or professional help becomes more cost-effective.
Step 2: Repair High Spots and Prepare the Surface
High spots require removing material from the peak, which demands more equipment and caution than filling low spots.
Grinding or Sanding High Spots
For concrete, rent a floor grinder. These machines have rotating stone or diamond pads that grind down the surface. Start with coarser grit and progress to finer grits. Grind only the high spot, checking progress frequently with the straightedge. It's easy to over-grind and create a new low spot.
For wood subfloors, use a belt sander or orbital sander. Work carefully to bring the high spot down to surrounding level. Vacuum thoroughly after grinding or sanding, then wipe with a damp cloth to remove all dust.
Installing Plywood Underlayment for Wood Joists
If your wood subfloor has significant deflection or multiple high and low spots, plywood underlayment distributes weight across a larger area, reducing the impact of minor flatness issues.
Use 1/4-inch plywood underlayment rated for flooring. Lay sheets perpendicular to joists, staggering seams. Leave a 1/4-inch gap around the room's perimeter for expansion. Fasten with screws spaced every 8 inches using 1-1/4-inch subfloor fastening screws. Tape seams with self-adhesive fiberglass mesh tape to prevent telegraphing through the LVP. Check flatness again with your straightedge once underlayment is installed.
Step 3: Moisture Barrier and Acclimation Requirements
Moisture is the silent killer of flooring installations. Proper moisture management requires attention before, during, and after installation.
Why Moisture Barriers Matter Before LVP Installation
A moisture barrier is thin plastic sheeting that prevents moisture from rising through the subfloor into the LVP. On concrete slabs, moisture vapor naturally migrates upward even if the concrete feels dry. LVP is water-resistant, but adhesives and locking mechanisms are not. Moisture under the floor causes subfloor swelling, movement, and stress on locking systems, plus mold growth.
Install a moisture barrier on concrete subfloors unless the concrete has been sealed. Use 6-mil polyethylene sheeting, overlapping seams by at least 6 inches and taping with moisture-resistant tape. For wood subfloors, a barrier is less critical if the wood is dry and well-ventilated, but still recommended in basements or high-humidity areas.
Acclimation Timeline and Best Practices
LVP must acclimate to your home's temperature and humidity before installation. Most manufacturers recommend 48-72 hours. Open boxes and lay planks flat in the installation room to reach equilibrium. Don't stack boxes or leave them in cold garages or humid basements. Check your product documentation for specific acclimation requirements.
Luxury Vinyl Plank Installation Mistakes to Avoid
Understanding what to avoid is as important as knowing what to do.
Skipping Floor Prep and Flatness Verification
This is the biggest mistake. Contractors and DIYers skip flatness verification because it takes time and requires renting tools. Then gaps appear within months and the locking mechanism fails. Check flatness with a straightedge, mark problem areas, repair them properly, and verify flatness again before opening the first box of planks.
Ignoring Manufacturer Specifications and Click-Lock Gaps
Manufacturer instructions aren't suggestions, they're warranty requirements. Specifications cover acclimation time, flatness tolerance, moisture requirements, and installation methods. Most manufacturers recommend 1/4-inch expansion space around the perimeter. Installing planks tight against walls leaves no room for expansion, causing buckling. Read instructions carefully and follow them exactly.
Failing to Account for Floor Deflection in Floating Floors
A floating floor moves slightly when walked on, this is normal. However, excessive deflection stresses locking mechanisms and causes premature failure. Manufacturers typically allow up to 1/4 inch of deflection over a 12-foot span. If you notice significant movement, your subfloor needs reinforcement through additional blocking or support.
When to Hire a Professional for Subfloor Repair
Some situations require professional expertise and equipment. Hire a professional if your subfloor has structural damage, significant settling, or moisture issues you can't diagnose yourself. Hire a professional if flatness issues exceed 1/2 inch in depth or cover more than 30% of the floor area. Hire a professional if you suspect moisture problems but can't determine the source, or if you're uncomfortable working with power tools.
For the Hamptons carpet one floor and Home service area in Suffolk County, we can recommend qualified subfloor specialists and offer consultation services where our team assesses your subfloor and recommends the best repair approach. A $100-150 consultation often saves thousands by catching problems early.
Frequently Asked Questions
How uneven can a subfloor be for luxury vinyl plank installation?
Most LVP manufacturers require subfloors to be flat within 3/16 inch over 10 feet for floating floors. This means no dips deeper than 3/16 inch in that span. Concrete slabs must meet similar flatness tolerance standards, while wood subfloors with significant undulations may need plywood underlayment or shimming. Exceeding these tolerances risks gaps in click-lock systems and floor deflection issues.
What tools are needed for subfloor preparation before laying LVP?
Essential tools include a 10-foot straightedge for measuring flatness, a moisture meter to check subfloor moisture content, a concrete grinder for high spots, a patching knife for applying leveling compound, and a level. For wood subfloors, you'll need a circular saw for plywood installation and shim materials. A vacuum and damp cloth prepare the surface for moisture barriers and acclimation.
Can I use underlayment to fix an uneven subfloor for LVP?
Underlayment can help mask minor undulations and provide moisture barrier protection, but it won't fix structural issues. For low spots exceeding 3/16 inch over 10 feet, self-leveling compounds are more effective. Plywood underlayment works well for wood joists with floor deflection concerns. However, for significant dips or high spots, repair methods like leveling agents or grinding should be completed first to ensure proper click-lock engagement.
What's the cost-benefit of repairing versus replacing a subfloor before LVP installation?
Minor repairs using self-leveling compounds or patching compound cost $100-$300 and take 1-2 days. Plywood underlayment adds $200-$500. Full subfloor replacement costs $1,500-$3,000+. For small uneven areas, repair is cost-effective. For extensive damage, joists, or severe undulations, professional assessment is worth the investment to avoid future gaps, movement, or voided warranties on your luxury vinyl plank.
This article was written using GrandRanker