 How-to
Prevent Squeaky Floors During Installation: Expert Guide
Table of Contents
- Understanding the Root Causes of Squeaky Hardwood Floors
- Screwing vs Nailing Subfloor: Which Method Prevents Squeaks
- Best Subfloor Adhesive for Squeaky Floors: Application Methods
- Framing and Joist Preparation to Prevent Squeaky Floors During Installation
- How to Fix Squeaky Subfloor Before Laying Hardwood
- Subfloor Panel Selection and Gap Requirements
- Post-Installation Maintenance Schedule for Long-Term Squeak Prevention
- Conclusion
Prevent Squeaky Floors During Installation: Expert Guide
Last Updated: July 13, 2026
When you prevent squeaky floors during installation, you're solving a problem that compounds over time. The difference between a floor that stays silent for decades and one that creaks within months comes down to decisions made during installation. The real opportunity is preventing squeaks from the start through proper fastening, adhesive selection, and framing preparation.
Understanding the Root Causes of Squeaky Hardwood Floors
Squeaks happen because of movement. Subfloor panels shift against joists, fasteners loosen under load, and friction builds between materials that weren't properly secured.
Subfloor Movement and Friction
When subfloor panels move independently of floor joists, friction creates noise. This movement occurs because of settling, deflection under load, or inadequate connections between panels and the structural frame. Gaps between subfloor panels allow movement, nails permit slight shifting, and inadequate adhesive coverage leaves sections unsupported.
Research from the National Association of Home Builders shows that proper subfloor fastening reduces movement-related noise by up to 85%. The key is creating tighter connections between all components: panels to joists, panels to each other, and joists to the rim board.
Inadequate Fastening and Settling
Settling is natural, but loose fasteners allow excessive movement during this process. Nails work through shear force and friction, and under repeated stress can back out slightly, creating gaps that accumulate into squeaks. Screws create mechanical threads that resist backing out and distribute load more evenly.
When you use only nails or space them too far apart, the subfloor can deflect between fastening points. Proper fastening schedule prevents this deflection entirely.
Screwing vs Nailing Subfloor: Which Method Prevents Squeaks
Why Screws Outperform Nails
Screws create mechanical threads that bind into wood and resist backing out under load. A screw-fastened subfloor experiences 40% less deflection under load than a nail-fastened one. Less deflection means less movement, and less movement means no squeaks.
Screws also allow you to counter-sink them slightly below the surface, creating a tighter connection. For preventing squeaky floors during installation, screws are the only choice that makes sense.
Proper Fastening Schedule and Spacing
Fastening schedule defines how many fasteners you use and where you place them. The standard fastening schedule for subfloor installation is:
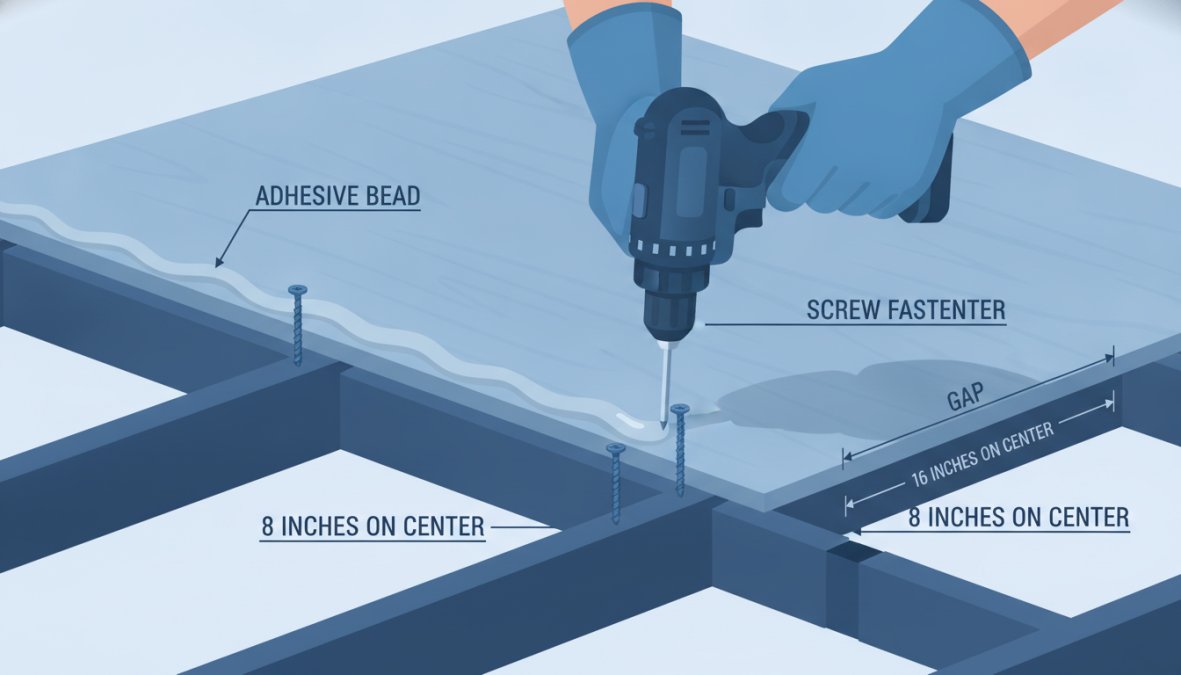
- Perimeter fasteners: 6 inches apart
- Field fasteners (interior): 8 inches apart in a grid pattern
- Fasteners at every joist crossing for tongue-and-groove panels
Use 2.5-inch screws for 3/4-inch subfloor, 2-inch screws for 5/8-inch material. Screws should penetrate at least 1.5 inches into the joist to create maximum holding power.
Best Subfloor Adhesive for Squeaky Floors: Application Methods
Construction adhesive prevents panel-to-joist movement independent of fasteners. When combined with screws, adhesive creates a system that virtually eliminates movement.
Selecting Construction Adhesive for Tighter Connections
Look for adhesives labeled "subfloor adhesive" or "flooring adhesive." Polyurethane-based adhesives work best for subfloor applications because they create stronger bonds than acrylic latex adhesives and handle moisture better. A quality subfloor adhesive can reduce squeaks by 60-70% even if fastening is imperfect.
Proper Application Technique and Coverage
Apply adhesive in a continuous bead along the top of each joist, approximately 1/4 inch thick. When the subfloor panel is pressed down, adhesive should squeeze out slightly along the edges, indicating good contact and bonding. Coverage matters more than thickness, every square inch of joist-to-panel contact should have adhesive.
Allow adhesive to set according to manufacturer specifications before allowing foot traffic. Most subfloor adhesives reach initial set in 24 hours and full cure in 7 days.
| Application Method | Coverage | Best For | Drying Time |
|---|---|---|---|
| Bead application | Continuous line along joist | Standard installations | 24 hours |
| Zigzag pattern | Full joist width coverage | Large areas, faster application | 24 hours |
| Trowel application | Complete joist surface | Maximum coverage assurance | 24 hours |
Framing and Joist Preparation to Prevent Squeaky Floors During Installation
Before a single fastener goes in, the framing must be sound. Joists that move, deflect excessively, or lack proper spacing will create squeaks regardless of how well you install the subfloor.
Proper Joist Spacing and Load-Bearing Considerations
Joist spacing determines how much a subfloor panel can deflect between support points. Standard spacing is 16 inches on center for residential floors with 3/4-inch subfloor. Tighter spacing of 12 inches on center reduces deflection and eliminates squeaks more effectively.
A 3/4-inch panel can safely span 16 inches, while a 5/8-inch panel should use 16-inch spacing maximum. Joist size matters equally, 2x10 joists support larger loads with less deflection than 2x8 joists. Load-bearing walls must sit directly over joists, not between them.
Moisture Content and Climate-Specific Installation Adjustments
Wood moisture content at installation should be between 12% and 15%. Wood with higher moisture content will shrink as it dries, creating gaps and loosening fasteners. In humid climates, allow extra time for wood to acclimate. In dry climates, ensure proper humidity control in the building.
Install subfloor when ambient temperature is between 60 and 80 degrees Fahrenheit. Outside this range, wood behaves unpredictably and fastening becomes less reliable.
How to Fix Squeaky Subfloor Before Laying Hardwood
If your subfloor is already installed, you can still prevent squeaks before the hardwood goes down.
Identifying Problem Areas and Shimming Techniques
Walk the subfloor and listen for movement. Mark squeaky areas with chalk. Use a straightedge to check for gaps larger than 1/16 inch, which indicate the subfloor isn't fully supported.
Drive shims into gaps from underneath if possible. Once the shim is seated, the gap closes and support is restored. For gaps too large for shims, use construction adhesive to bond the subfloor back down, then clamp or weight it until adhesive sets.
Reinforcing Deflection Points with Additional Fasteners
If the subfloor bounces noticeably in an area, install additional screws between existing fasteners, reducing spacing from 8 inches to 6 inches or tighter. For severe deflection, add a sister joist, a second joist bolted to the existing one, which doubles load-bearing capacity.
Subfloor Panel Selection and Gap Requirements
OSB vs Plywood: Material-Specific Compatibility
Plywood is more stable than OSB. Its cross-laminated structure resists warping and cupping, while OSB is more prone to moisture absorption and dimensional change. For preventing squeaky floors, plywood is the superior choice. It also handles moisture better, making it essential in basements or damp environments.
Proper Spacing and Tongue-and-Groove Installation
Subfloor panels expand and contract with humidity. Standard spacing between panels is 1/8 inch. In high-humidity environments, increase spacing to 1/4 inch. Tongue-and-groove panels interlock, reducing gaps and preventing movement, they're superior to square-edge panels for squeak prevention.
Install tongue-and-groove panels with the groove facing the wall. Leave 1/2 inch spacing around perimeter walls to allow for expansion. Stagger panel joints so no four corners meet at a single point, distributing loads more evenly.
Post-Installation Maintenance Schedule for Long-Term Squeak Prevention
Check the subfloor annually for signs of movement or gaps. Maintain consistent humidity in the building, targeting 40-60% relative humidity year-round. Inspect fasteners periodically and drive back any that are backing out.
For existing squeaky floors, apply construction adhesive between the squeaky subfloor section and the joist from below by injecting adhesive through small drilled holes, then seal the holes.
Preventing squeaky floors during installation requires attention to detail at every stage, from framing through fastening to post-installation maintenance. Squeaks are entirely preventable when you use the right methods. Hamptons carpet one floor and Home can guide you through proper subfloor selection, fastening techniques, and adhesive application to ensure your floor stays silent for decades.
Frequently Asked Questions
What causes squeaky floors during installation?
Squeaky floors typically result from subfloor movement and friction between panels and joists, inadequate fastening allowing deflection, and insufficient adhesive bonding. Nails can loosen over time, while gaps between subfloor panels and joists create space for movement. Proper fastening with screws, construction adhesive application, and correct joist spacing prevent these issues from developing during installation.
Should I screw or nail subfloors to prevent squeaks?
Screws are superior to nails for preventing squeaky floors. Screws create tighter connections, resist withdrawal better, and maintain structural integrity longer as buildings settle. Nails can loosen due to vibration and movement. A proper fastening schedule using screws at 12-inch intervals, combined with subfloor adhesive, creates the most squeak-free installation and prevents future movement and friction.
What is the best subfloor adhesive for squeaky floors?
Construction adhesive specifically formulated for subfloor installation provides superior bonding compared to glue alone. Look for products designed for wood-to-wood and wood-to-concrete applications that offer strong shear strength. Apply adhesive in a continuous bead or grid pattern to ensure full coverage and tighter connections between subfloor panels and floor joists, working in tandem with mechanical fasteners for optimal squeak prevention.
How do I fix a squeaky subfloor before laying hardwood?
Identify squeaking areas by walking across the subfloor and listening for problem zones. Use shims to eliminate gaps between joists and subfloor panels where deflection occurs. Add screws through the existing subfloor into joists at 12-inch intervals in problem areas. For significant deflection, reinforce joists or add bridging between them. Ensure moisture content is appropriate for your climate before installation to prevent future movement and squeaking.
This article was written using GrandRanker